
Commercial logo projectors (LED Gobo lights) are critical assets for storefront advertising, corporate branding, and event marketing. This comprehensive technical guide integrates factory insights, field engineering practices, and original manufacturer repair protocols to help you diagnose, troubleshoot, and repair your gobo projection lamps safely and efficiently.This article summarizes my daily work experience alongside colleagues in handling after-sales customer service—including identifying specific faults, pinpointing root causes, and delivering solutions. The content may not cover all scenarios. If you wish to learn more, or have encountered any issues with projection lights, feel free to leave a comment below this article. I will arrange our professional engineering staff to provide you with dedicated technical support and answers.
1. No Light Output (Projector Completely Dead)
New Device Out-of-the-Box Failure
- Power Supply Check: Verify that the outlet is active and the power cord is securely plugged in. Try an alternative outlet to isolate the issue.
- Remote Control Models: Replace the remote control battery or press the physical power button on the chassis to rule out a faulty remote.
- Voltage Verification: Match the input voltage. A 220V/110V direct-plug model will not function on a low-voltage adapter, and low-voltage (12V/24V) models will burn out if plugged directly into high-voltage mains.The voltage of the lamp must match the local voltage of your region. We support customized lamps for most voltage specifications. Please inform us before placing your order, which can effectively prevent many after-sales problems.
- Internal Fuse: Disassemble the outer casing and locate the built-in fuse. If the filament is broken, replace it with a fuse of identical specifications.If you are not familiar with replacing fuses, please let us know. We will arrange our engineers to have a video call with you to ensure you replace the fuse correctly and safely.
Sudden Shutdown During Operation
- Check the Cooling Fan: If the fan is completely dead, the LED driver (power supply) has failed; replace it. If the fan spins but there is no light, the LED COB chip is likely burnt out and needs factory replacement.
- Electrostatic Lockout (ESD): Disconnect power completely and let the unit sit for 15 minutes. Press and hold the power button for 10 seconds to discharge residual electricity before restarting.
- Overheating Protection: Heavy dust accumulation can block air vents. Clean out the dust, allow the machine to cool down for 30 minutes, and power it back on.The power supply we adopt is equipped with overheat protection. When the temperature exceeds 60°C, the projection light will automatically cut off power as an overheat safeguard to protect itself. It can resume normal operation once the temperature drops below 60°C.
Projector Flashes Once and Goes Dark
- Oxidized Contacts: Disconnect power, let the unit cool, open the light chamber, and inspect the LED chip contacts. If they look oxidized or blackened, gently sand them with ultra-fine sandpaper and re-secure them.
- Fan RPM Failure: If the cooling fan is stuck or spinning too slowly, the system’s smart self-diagnostic feature will force a shutdown to protect the chip. Replace the fan.
- Blown Capacitors: Inspect the internal driver board. If the electrolytic capacitors are bulging or leaking, the driver power board must be replaced.
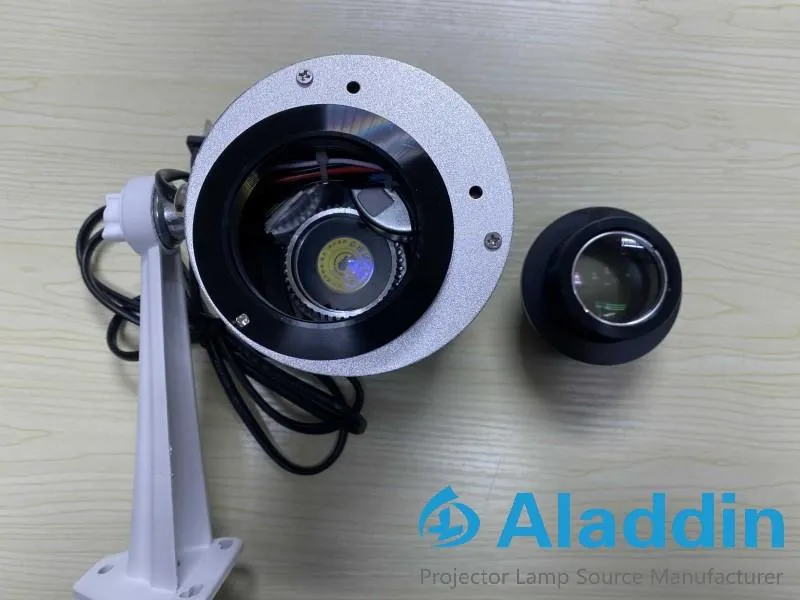
2. Blurry, Misty, or Faded Projection Imagery
Blurry Image (Most Common Fault)
- Manual Focusing: Rotate the front lens focusing ring slowly to the left or right until the edges of the projected logo become sharp and crisp.
- Dust Accumulation: Wipe the external lens using an ultra-fine microfiber lint-free cloth. Never use paper towels or bare fingers, which leave oils or scratches.You may also wipe it with a glasses cleaning cloth.
- Throw Distance Violation: Ensure the projection distance falls within the manufacturer’s specified range. If it is too close or too far, relocate the fixture.
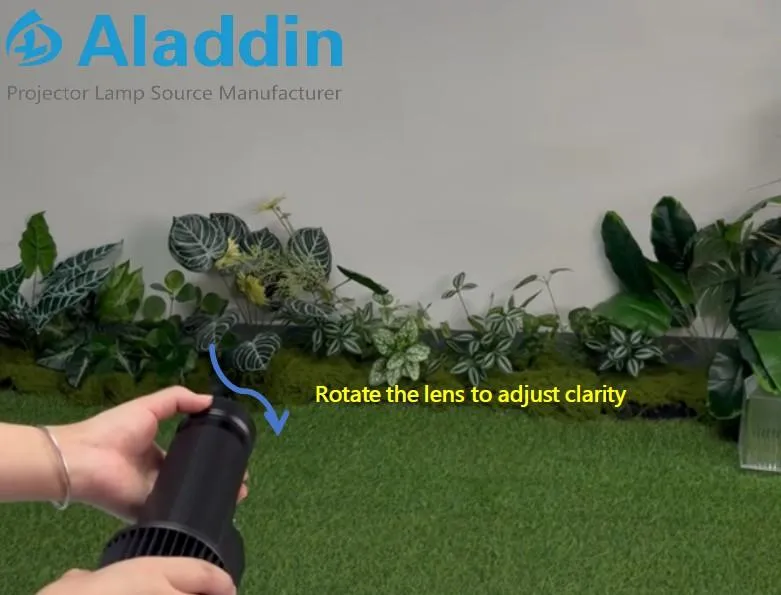
Lens Fogging / Milky, Misty Output
- Moisture Ingress (Outdoor Models): If the waterproof rubber gasket degrades, humidity enters the lens housing. Disassemble the front lens, wipe away the moisture, and reinstall it while ensuring the waterproof seal is tightly seated.
- Internal Condensation: Prolonged operation in poor ventilation causes condensation. Keep the projector running continuously for 2 hours to bake out internal moisture.
Color Distortion, Dimming, or Dark Spots
- Burnt LED Segment: Permanent black spots in the center of the image indicate that the LED matrix/COB chip is damaged and must be replaced.
- Dirty Gobo Slide: Dust or soot on the glass Gobo slide causes discoloration. Remove the Gobo slide carefully, clean it with an wipe, and seat it correctly back into its slot.
3. Light Flickering, Strobing, or Intermittent Dimmness
- Driver Failure: The most common culprit is a bulging or leaking electrolytic capacitor on the driver board. Replace it with an identical constant-current LED driver.
- Cold Solder Joints: Due to repeated thermal expansion and contraction, solder joints on the LED board can crack. Re-solder loose connections using a soldering iron.
- Voltage Instability: If the projector shares a circuit breaker with high-power appliances, voltage drops can cause strobing. Isolate the projector onto its own dedicated power line.
4. Rotation Motor Failure (Stalling, Jerking, or Noises)
- Motor Stationary: Inspect the internal wire harness connecting the motor to the mainboard. If the wiring is intact but there is no movement, replace the stepper/synchronous motor.
- Jerking Movement & Friction Noise: Dust and grit can settle into the gear mechanism. Open the gear housing, clear out the debris, and apply a fresh layer of high-temperature lithium grease.
- Unstable Rotation Speed: If the logo spins erratically, the motor driver sub-board has malfunctioned. Replace the control module.
5. Outdoor Waterproof Projector Water Ingress & Shorts
Symptoms: Persistent heavy condensation inside the lens, rust visible through the housing, or tripping the main circuit breaker immediately upon power-up.
- Immediate Power Cut: Disconnect the main power line instantly to prevent permanent short circuits.
- Teardown and Dehumidification: Completely disassemble the housing. Use a hairdryer set to a low, warm setting to thoroughly dry all internal components, PCBA boards, and wire harnesses.
- Resealing: Replace old, cracked silicone waterproof rings. Apply high-grade outdoor waterproof silicone sealant along the casing seams before reassembly.
Summary of Core Component Diagnostics
| Fault Symptom | Root Cause Category | Primary Component to Inspect | Recommended Action |
| Completely Dead | Power Delivery / Fuse | Built-in Fuse & Input Voltage | Replace fuse / Match correct voltage |
| Fan Runs, No Light | Light Source Failure | LED COB Chip / Lamp Board | Replace LED Light Module |
| No Fan, No Light | Driver Circuit Failure | Constant-Current LED Driver | Replace Driver Power Supply Board |
| Blurry/Misty Logo | Optical Alignment | Lens Focusing Ring / Seal Gasket | Adjust Focus / Clean with Microfiber |
| Constant Strobing | Capacitance Failure | Driver Board Electrolytic Capacitors | Replace complete Driver Board |
| Grinding Noise | Mechanical Wear | Rotation Motor Gear Box | Clean debris and apply high-temp grease |
6. Universal Safety Protocols & Maintenance Guidelines
⚠️ WARNING: High Voltage & Thermal Hazard Always isolate the unit from the power mains before opening any enclosure. Allow the unit to sit idle for 15 to 30 minutes post-operation as internal heatsinks exceed safe touching temperatures.
Always isolate the unit from the power mains before opening any enclosure. Allow the unit to sit idle for 15 to 30 minutes post-operation as internal heatsinks exceed safe touching temperatures.
- Handling Components: Never touch the surface of the emitting LED COB chip with your bare hands. Skin oils create localized hot spots that dramatically accelerate burn-out rates.
- Exact Matching Parts: When replacing drivers or fuses, ensure electrical specifications match exactly to prevent catastrophic electrical failure.
- Preventative Maintenance Schedule: Establish a monthly maintenance cycle to clear dust from the cooling fans and air channels. Doing so reduces overall thermal failure rates by over 80%.
Authority & Industry Standards Documentation
For deeper technical specifications, refer to international lighting and engineering safety standards:
- Underwriters Laboratories (UL 1598) – Safety standard governing luminaires, specifying grounding and thermal insulation limits for commercial projectors.
- International Electrotechnical Commission (IEC 60529) – Defines degrees of protection provided by enclosures (IP Code), critical for maintaining outdoor IP65/IP67 waterproof logo lights.