
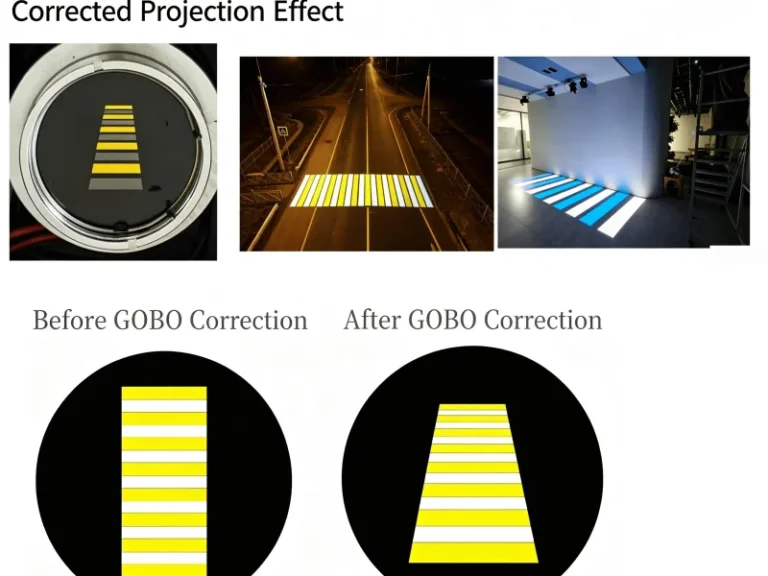
A logo projector produces its best image when it faces the target surface directly. However, real projects rarely offer a perfect mounting position.
Walls, ceilings, walkways, landscaping, and existing equipment can limit the available space. Installers may need to mount the projector above, below, or beside the target area.
This angled position often stretches the projected logo into a trapezoid. Text becomes uneven, circles become oval, and straight edges start to lean.
Gobo pattern correction for angled projection solves this problem before the projector reaches the site. It compensates for the mounting angle and restores the intended image proportions.
The method works with commercial logo displays, storefront advertising, floor graphics, building façades, and industrial warning patterns.

What Is Gobo Pattern Correction?
Gobo pattern correction is an optical compensation method for an angled logo projection.
When a projector faces a surface from an angle, one side of the image sits farther from the lens. The light spreads unevenly across the surface.
This creates keystone or trapezoidal distortion.
Instead of changing the building structure, our engineers modify the artwork on the gobo slide. The artwork receives calculated pre-distortion based on the actual installation measurements.
The corrected gobo may look unusual when viewed outside the projector. Once installed, the projection angle reverses that distortion.
The image then appears straight and proportional on the target surface.
If you are unfamiliar with gobo construction, read our guide on how to choose the right gobo material.
Why Does an Angled Logo Become Distorted?
Projection distance changes across the target surface during an angled installation.
The nearest part of the image stays smaller. The farthest part becomes larger. This difference creates the familiar trapezoidal appearance.
A steep angle can also cause:
- Stretched text
- Uneven logo proportions
- Curved-looking edges
- Reduced image sharpness
- Uneven brightness
- Difficult focus adjustment
Increasing projector power cannot correct these geometric problems. A brighter projector only makes the distorted image more visible.
The proper solution requires accurate measurements, a suitable lens, and a custom corrected gobo for a logo projector.
Why Is Gobo Pattern Correction Important?
Logo projection often represents a business, hotel, shopping centre, event, or public project. An incorrectly shaped logo can weaken the entire presentation.
Proper correction provides several practical benefits.
It Removes Keystone Distortion
Gobo correction compensates for the mounting angle. It makes projected edges appear straight on the intended surface.
It Preserves Logo Proportions
Brand symbols, text, and graphic details remain closer to the original artwork. This supports consistent branding across different locations.
It Improves Readability
Corrected text is easier to read from the expected viewing direction. This matters for entrance signs, promotional messages, and directional graphics.
It Provides More Installation Flexibility
The projector does not always need a central mounting position. Installers can work around doors, windows, walkways, and architectural structures.
It Creates a More Professional Result
Accurate geometry makes the projection look planned instead of improvised. This is especially important for commercial and architectural projects.
Businesses comparing equipment can also review our guide on how to choose a logo advertising projector.
When Is Gobo Pattern Correction Needed?
Not every installation needs a corrected gobo. The decision mainly depends on the angle between the projector and the target surface.
We use the following ranges as general project references:
- Above 30 degrees: correction is recommended.
- Above 40 degrees: correction is normally required.
- Between 20 and 70 degrees: customized correction is generally possible.
These values are not the only factors.
Projection distance, image size, lens ratio, surface direction, and viewing position also affect the result. Accurate measurements become increasingly important at steeper angles.
For severe distortion, engineers should evaluate the complete installation before producing the slide.
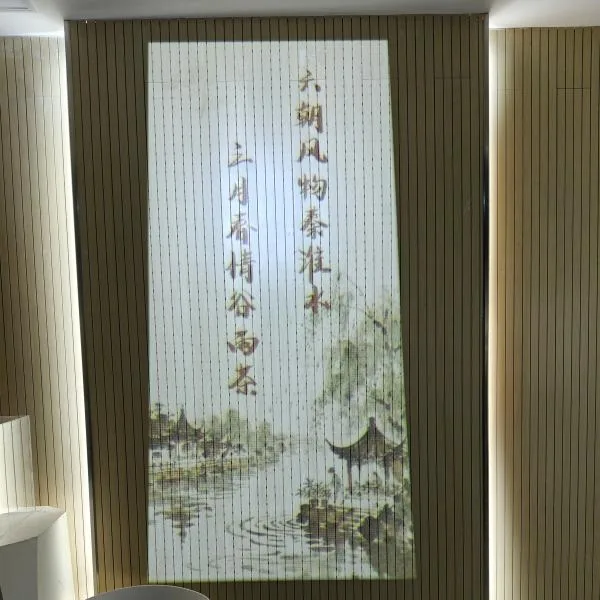
Where Can Corrected Gobo Projection Be Used?
A custom gobo slide for floor projection or wall projection supports many commercial applications.
Common examples include:
- Storefront entrance logos
- Hotel wall branding
- Shopping centre advertising
- Exhibition booth graphics
- Event sponsor logos
- Warehouse floor signs
- Factory safety warnings
- Pedestrian guidance patterns
- Parking entrance signs
- Building façade advertising
Large outdoor installations may require dedicated outdoor gobo projectors. These models support demanding distances and changing weather conditions.
For larger exterior surfaces, explore our building projection lights.
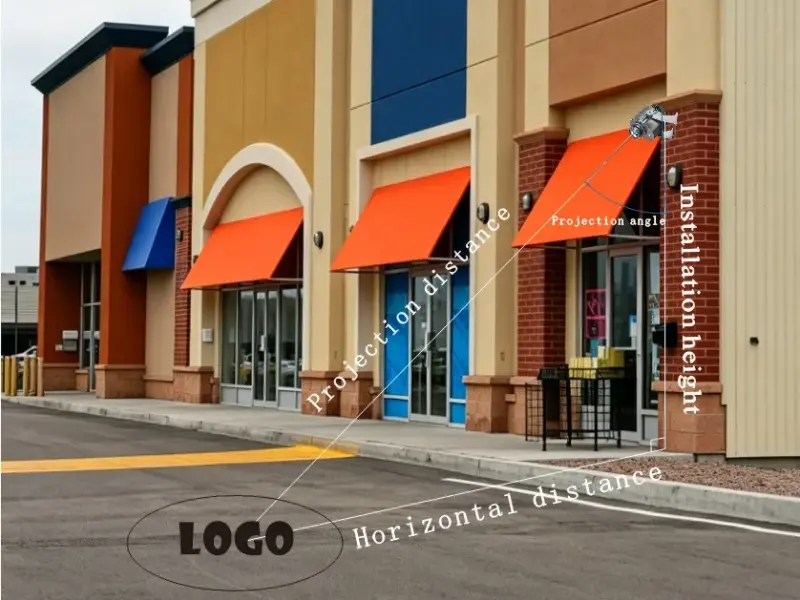
How to Measure a Downward Floor Projection
A downward installation places the projector above the target. The image appears on a floor, pavement, roadway, or entrance area.
Two measurements are essential.
1. Horizontal Distance
Measure from the point directly below the projector to the centre of the projected image.
This measurement should follow the floor. Do not use the diagonal length of the light beam.
2. Mounting Height
Measure vertically from the projector lens to the floor.
These two values allow engineers to calculate the downward projection angle.
You should also provide the required image width and height. This information helps determine the correct lens ratio.
A clear site photograph can reduce misunderstandings during the design stage.
How to Measure an Upward Wall Projection
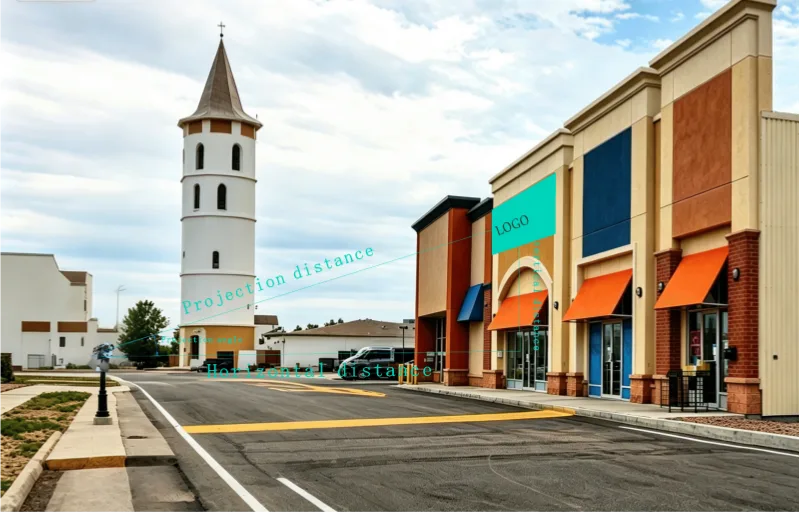
An upward installation places the projector below the target image. The light travels upward toward a wall or building façade.
Two measurements are required.
1. Horizontal Distance
Measure from the projector lens to the target wall.
Keep this measurement parallel to the ground whenever possible.
2. Vertical Distance
Measure from the projector level to the centre of the planned logo.
Do not measure only from the ground. The calculation needs the height difference between the lens and image centre.
These values determine the actual angle for the angled logo projection on a wall.
For the best result, include a front-view photo and a side-view photo. Mark the projector and logo positions on both images.
What Information Should You Provide?
Customers often ask how to measure a logo projector installation before requesting a quotation.
Prepare the following details:
- Projector mounting position
- Projection direction
- Horizontal distance
- Mounting height
- Vertical target position
- Required image size
- Target surface material
- Surface colour
- Indoor or outdoor environment
- Nearby lighting conditions
- Original artwork file
- Expected viewing direction
Vector artwork usually provides the best production result. Recommended formats include AI, SVG, EPS, CDR, and vector PDF.
A high-resolution PNG may also work for a simple design.
How Is a Corrected Gobo Made?
The correction process starts with the original logo and confirmed site measurements.
First, engineers calculate the projection angle. They then estimate how the surface will stretch the image.
Next, the original artwork receives controlled pre-distortion. One side may become narrower, while another side may become wider.
This adjustment is intentional.
After production, the gobo enters the projector. The angled light path transforms the modified artwork into a correctly proportioned projection.
The finished image should look clear and straight from the planned viewing area.
This process helps correct trapezoid distortion in logo projection without rebuilding the mounting structure.
Gobo Correction Is Not Digital Keystone Correction
Digital video projectors often include software-based keystone adjustment. A traditional gobo projector uses an optical system and a physical pattern slide.
Therefore, its correction normally takes place within the gobo artwork.
This method does not require software during daily operation. It also keeps the projection stable after installation.
However, the corrected gobo depends on a fixed mounting arrangement. Moving the projector can change the result.
Large changes in height, distance, or angle may require a new correction design.
Which Gobo Material Should You Choose?
The right material depends on projector power, artwork detail, operating time, and environmental conditions.
Metal Gobo
Metal gobos work well for simple, single-colour patterns. They offer strong heat and impact resistance.
However, enclosed shapes may require connecting bridges. These bridges can appear in the projected image.
Glass Gobo
Glass gobos support fine text, detailed logos, and multiple colours. They do not require the same connecting bridges as metal designs.
Glass is suitable for most commercial logo projection projects.
Can One Corrected Gobo Work at Different Angles?
A corrected gobo is designed for one planned installation geometry.
Small adjustments may be acceptable. However, large position changes can make the image distorted again.
For example, increasing the mounting height changes the projection angle. Moving the image farther away also changes the required compensation.
Confirm the final mounting position before gobo production begins.
If the installation has not been finalized, provide several possible positions. Engineers can help identify the most practical arrangement.
Other Factors That Affect Projection Quality
Gobo correction improves image geometry, but it cannot solve every site problem.
A successful installation also depends on:
- Correct projector power
- Suitable lens ratio
- Stable mounting brackets
- Proper projection distance
- Low surrounding light
- Clean target surfaces
- Accurate focus adjustment
- Appropriate waterproof protection
Dark walls absorb more light than white walls. Bright streetlights can also reduce projection contrast.
For an outdoor project, testing during the planned operating period provides more reliable results.
Common Gobo Correction Mistakes
One common mistake is measuring the diagonal beam instead of the horizontal distance.
Another problem involves measuring from the ground instead of the projector lens.
Some customers also change the mounting position after approving the corrected artwork. This can reduce correction accuracy.
Other common mistakes include:
- Estimating distances without tools
- Providing an incorrect image centre
- Ignoring the final viewing direction
- Changing the required image size
- Selecting a lens before measuring the site
- Using low-resolution logo artwork
A proper commercial logo projector installation guide should address these factors before production.
Frequently Asked Questions
How can I correct a distorted projected logo?
Provide the horizontal distance, vertical distance, mounting height, target size, and original artwork. Engineers can calculate a corrected gobo design.
At what angle does a logo projector need correction?
Correction is generally recommended above 30 degrees. It normally becomes necessary when the projection angle exceeds 40 degrees.
Why does the corrected gobo look distorted?
The artwork contains calculated pre-distortion. The installation angle transforms it into a properly proportioned image.
Can gobo correction work for floor projection?
Yes. It can correct logos, warning signs, directional graphics, and advertising patterns projected onto floors.
Can it work for outdoor building walls?
Yes. An outdoor logo projector for building walls can use a corrected gobo. The projector must also meet the required distance and brightness.
Does a more powerful projector remove distortion?
No. Higher power can improve brightness, but it cannot correct image geometry. Gobo correction and proper lens selection remain necessary.
Can I reuse the corrected gobo at another location?
You can reuse it when the new installation has similar measurements. Different angles may require a new correction design.
What artwork format should I send?
Vector formats provide the best result. AI, SVG, EPS, CDR, and vector PDF files are preferred.
Get a Custom Gobo Correction Plan
An angled installation does not have to produce a stretched or trapezoidal logo.
With accurate measurements, a suitable projector, and a customized gobo, the finished pattern can remain straight and professional.
Before requesting a solution, prepare your installation photos, artwork, image size, mounting height, and horizontal distance.
Our engineers can evaluate the angle, recommend a suitable lens, and create a custom corrected gobo for your logo projector.
Contact Aladdin Lighting to submit your project measurements and receive a customized projection recommendation.